Tuesday 13 May 2014

I can't believe I won!

I found out yesterday that Samhain Sweets had won first place (newbie category) in the Undersized Urbanite competition! I had a hectic (real world) day yesterday and just couldn't find time to post.


As promised earlier here are links to some of the tutorials I used:

The brickwork- Brae at Otterine's miniatures

The stones- Carol at Victoria Miniland

The concrete path- Joanne at Joanne's Minis (youtube video)

The cup cakes- SugarCharmShop (youtube video)

The kitchen Table- Leslie Shepard at About.com miniatures

The grater- Elizabeth at StudioE (the measuring spoons are from Elizabeth too but I can't seem to find the page right now)

Thank-you to Christina of Little Victorian for hosting the contest (I had so much fun participating) and to the judges Brae, Victoria and Anna.

Thank-you to Christine Valentine for everything you did! 

Thank-you to all the miniaturists that share their ideas and experience and to all of you who have welcomed me into the doll house community.  

I know it sounds like I'm accepting an Oscar but I really am grateful and don't want to forget anyone.


Sunday 11 May 2014

Here We Go Again....

It's been a week since I finished Samhain Sweets. I spent the first few days unable to concentrate on anything. I thought I would need time to wind down and get thoughts of lollies and cakes out of my mind before moving on to a new project but that wasn't the case. The moment I put the last item in place it was finished. I've read that for some people a house is never really finished but for me it was.

The problem was that my brain moved straight into the next build and wouldn't let me think about anything else. Probably didn't help that the next kit was in full view. It seemed that every time I passed it it would call out "Psst... Annejuli, open me... You know you want to." It was right.

Step 2

The Orchid.

So far I have the basic shell glued together. I haven't glued the roof on, just testing the fit.


I have cut out many new bricks.

And I've spent the last couple of days painting the bricks. I used at least 2 colours on each brick and simply blended them until the brick was covered. I didn't rinse the brush much and found I was getting a lot more shades than the original 4. Really simple but time consuming. I made sure to paint around the edges in case the grout doesn't cover everything, seeing raw egg carton edges would spoil the look.


These are the paints I used. Burnt Sienna,Yellow Ochre, Burnt Umber and Raw Umber. To begin with I had cream and flesh on the pallet as well but the results looked more like wood grain than brick.

While I was painting I spotted one brick that stood out. I tried to remove as much of the label from the egg carton as possible before I started cutting but some seem to be stuck down with the best adhesive ever made. I dropped this one brick as I was about to paint it and was surprised to see an almost perfect Australian flag! When I showed Christine she said it has to be used in the build. She's right, I think I can make it work.


The skinny paddle pop sticks, skirting boards and cornices I ordered have just arrived so I'm off to play with them.

Thanks for stopping by. :-)


Sunday 4 May 2014

Welcome to Samhain Sweets

I finished my entry into the Undersized Urbanite competition at 2AM this morning. Prepare to be bombarded with LOTS of photos.

Located smack dab in the centre of the village of Samhain (pronounced so-wen) where every day is Halloween.


The Outside

I was lucky enough to have a nice sunny day today for taking pictures. The last few days have been rainy but today was lovely. Using the good camera and natural light makes quite a big difference to the quality of the photos, who knew? Well probably everybody but me.


 The bricks, stones and concrete pavers were all made from egg cartons. The shingles came with the kit and were individually painted before being applied to the roof.


 The garbage bin houses the battery for the lights. Unfortunately when I got everything plugged in only 2 of the 3 lights worked. For about a minute then 1 of them died. So only the light above the door works. I'm not sure what I can do about it. For now I'll take the Scarlet O'Hara approach and think about it tomorrow.


 The plants were made using aquarium plants, florist wire and acrylic paints. The planters are made to fit over the legs of chairs but when I saw them they looked just like terracotta planters so that's what they are now.
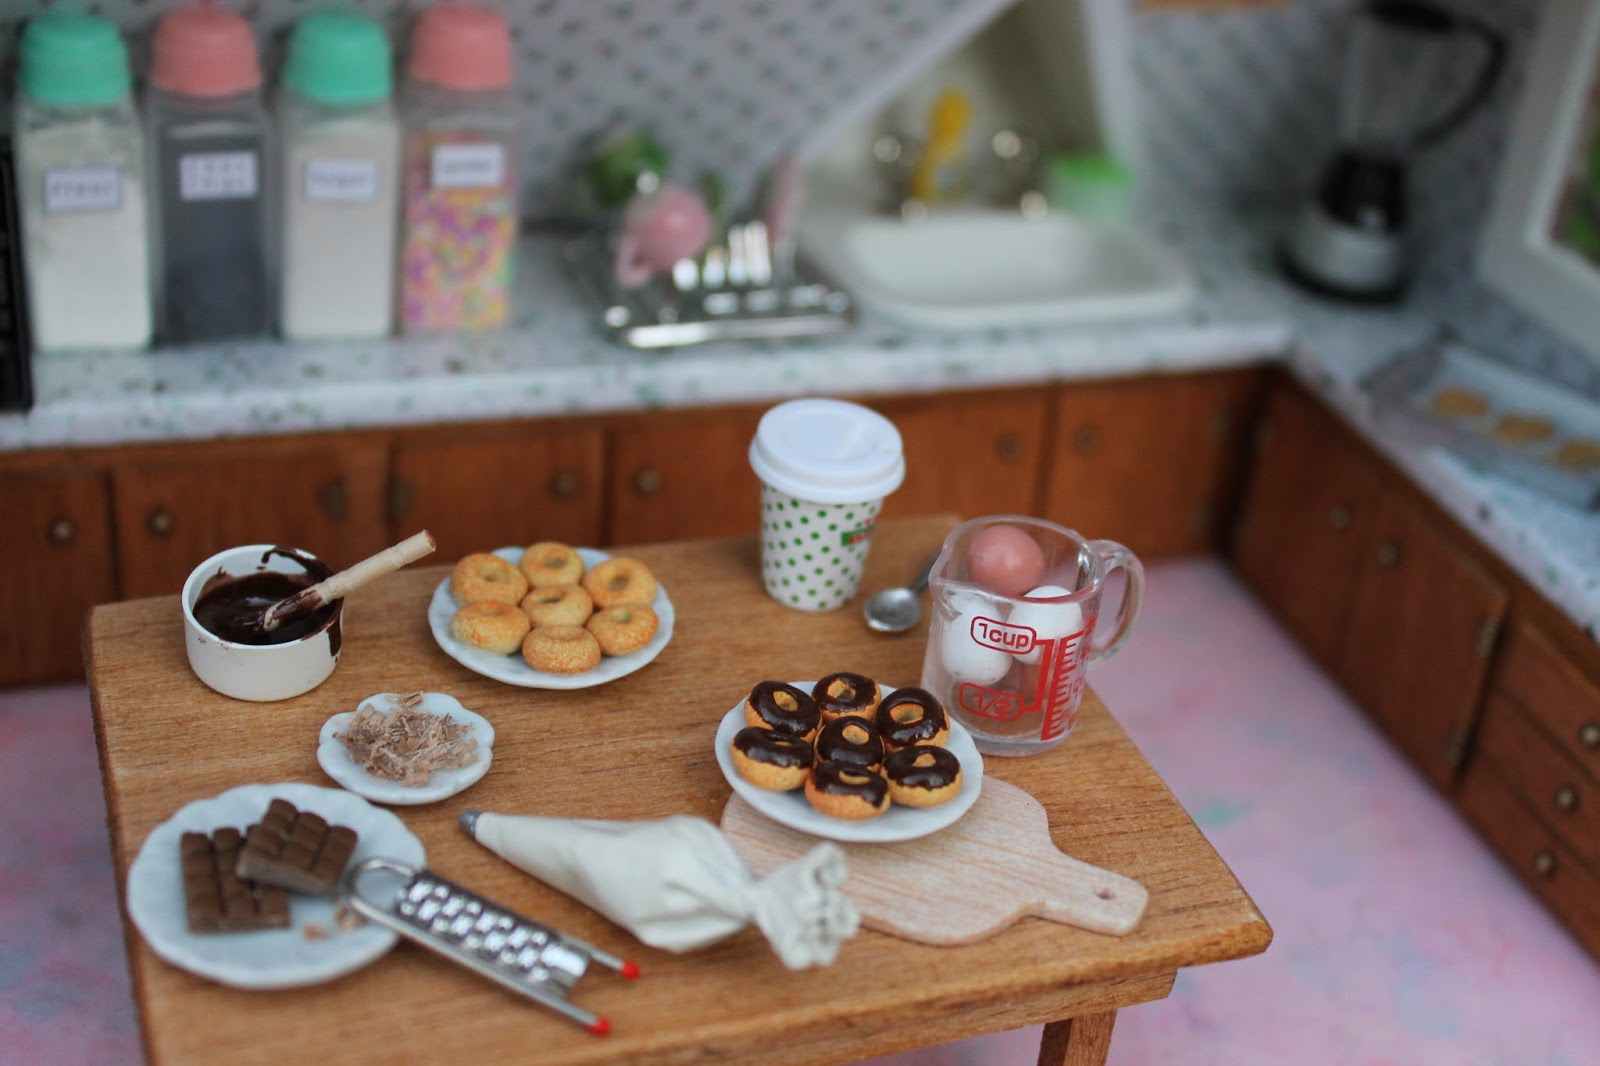


 The Kitchen 

 The kitchen looks quite bare to me. I had to skip over many details I had planned for this room. I started the build 10 weeks ago but about 5 weeks ago the real world decided to interfere and demand my attention. Then the flu hit. I was unable to do anything mini for 3 whole weeks! Sometimes reality sucks.
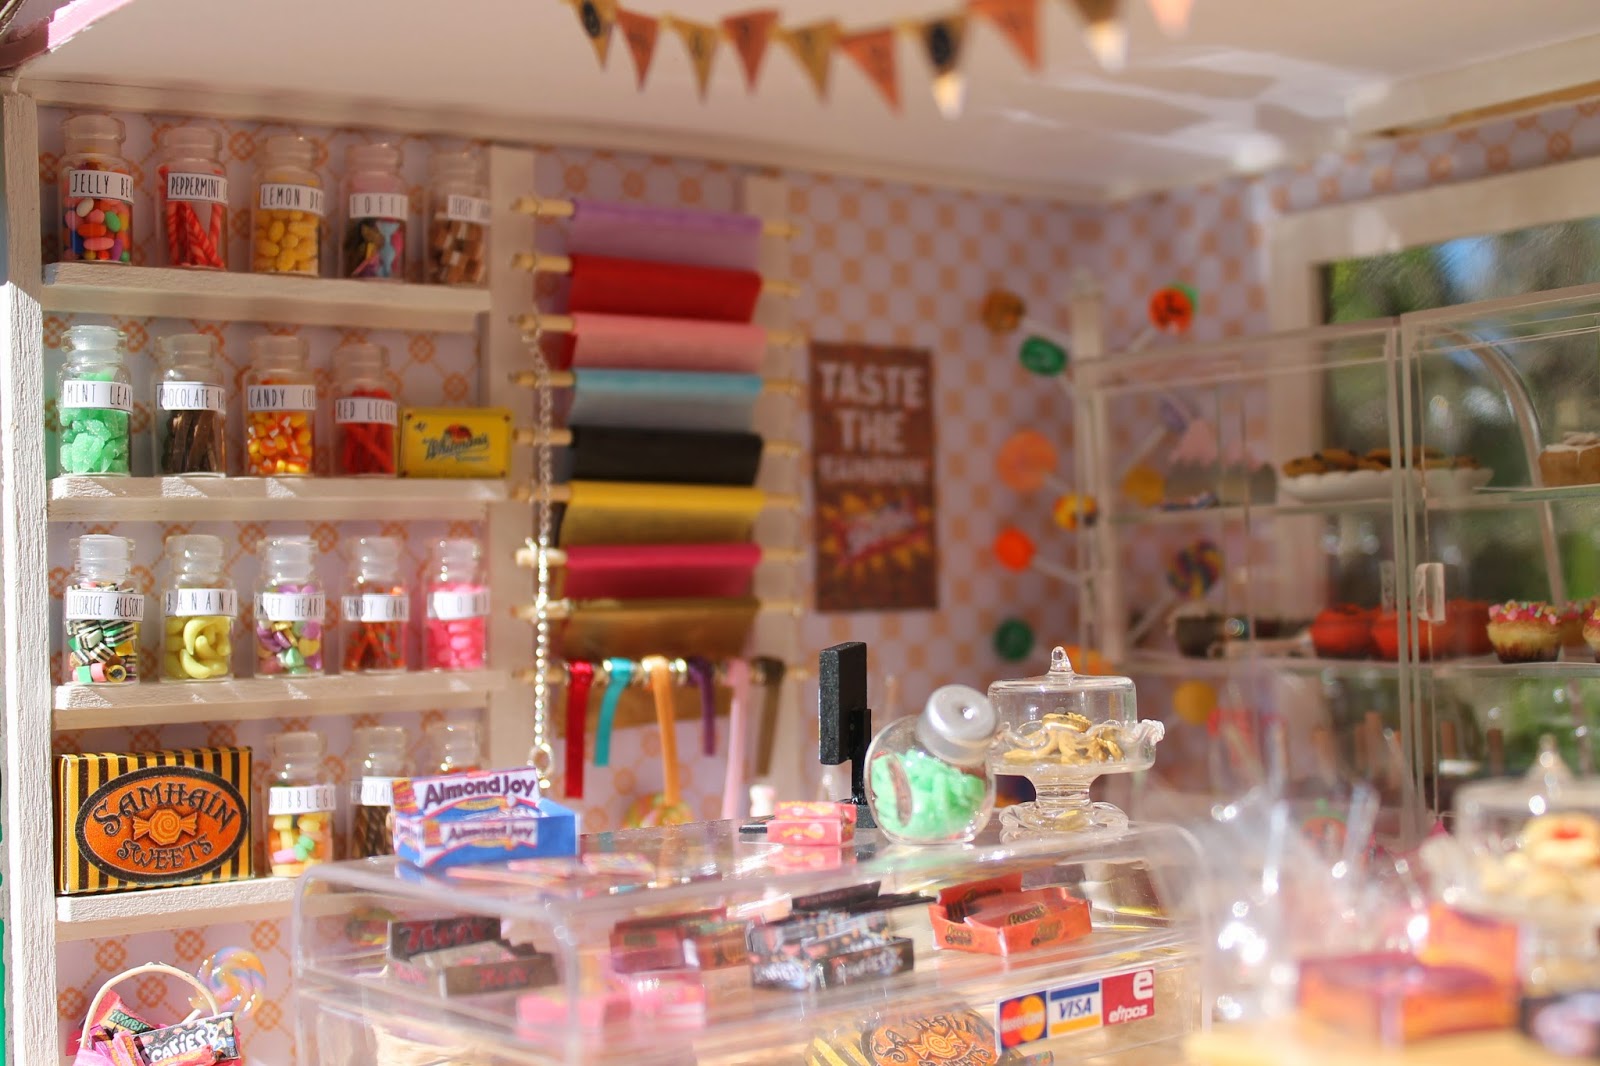


The Shop

This is my favorite part of the building. Each of the cakes, cookies and lollies were hand made from polymer clay. The "factory" packaged products were made by printing images of wrappers and folding, gluing and stuffing each package.


 I did buy a few things but most of what you see was hand made. In many cases I used tutorials by some of the many talented miniaturists kind enough to share their experience. I will be thanking them individually in an upcoming post, it's going to take me a short while to compile a list. I really need to post this before I manage to lose the photos or somehow destroy the internet completely.

Having said that there is one person that I must thank right now. My talented and patient daughter Christine (christinevalentine.com) Thank-you not only for designing the store logo, the chocolate boxes and lolly packets but for putting food in front of me 3 times a day and making sure I ate it. For putting up with my mood swings when I didn't think I could get it completed. For not complaining that every conversation you have had with me since the beginning was about miniatures. Most of all Thank-you for not once saying "It's only a doll house". I Love you.

To those of you who made it to the end of my very long post Thank-you.

Now I'm off to see to my 1:1 scale house, oh boy, what a mess!